Use of a Sealant to Stop Asphalt Shingle Leaks
The most difficult part of repairing a roof leak is finding the source of the leak; where and how is the water making its way inside! There are a couple of techniques to help you find the source of the leak: one is nature – find the location on a rainy day or use a hose to simulate the rain! But know where the weak spots are will save you time in locating the leak.
The most common cause of roof leaks are transitional roof areas: chimney, skylights, vents, valleys and dormer areas. Quite often the flashing is not installed correctly. Flashing is sheet metal installed at any transition point on an asphalt shingled roof to prevent leaks. If the flashing is not installed correctly the asphalt shingle roof is vulnerable to leaking.
Another factor in roof leaks with asphalt shingles is the pitch of the roof. Gravity is what keeps the water rolling off the roof. If a roof has a low slope there is more potential for the slow moving water to be blown under the asphalt shingles. And there is always the potential of melting snow on a roof to pool at an ice dam area and be pushed under the asphalt shingles.
Find the Leak
The first step to sealing an asphalt shingle leak is to find it. Small leaks around nail holes or flashing can be effectively fixed with a sealant. For large leaks, such as where shingles have been blown away in large patches, an asphalt sealer is not the answer. In this case, you must replace the missing shingles.
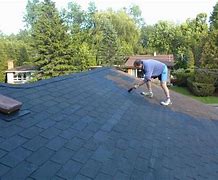
Sealing an Asphalt Roof
Slight buckling or cracking over the entire asphalt roof surface can be sealed effectively with an acrylic formula. The acrylic is sprayed over the entire roof and will seal minor cracks, chips and slight buckling. The formula will actually seal and bond the shingles together and create a clear, ultraviolet radiation-proof film coating.
Sealant Spray
Use a sealant spray for areas where the shingles leak around flashing, gutters or vents. These work in a similar manner to acrylic sealants, but they come in a spray can and are intended for smaller areas. The spray fills in the cracks or separations where the shingles meet flashing around chimneys, vents or skylights and forms a waterproof seal. The spray can lets you target and spray seal these areas quickly and easily.

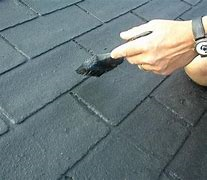
Roofing Tar
Roofing tar works best with leaks around flashing and fills in gaps, crevices and fissures around it.
Roofing tar can be spread or brushed on the affected flashing manually and can also be used where the sealant spray is used.
Roofing tar, when being applied, is not as neat as the sealant spray. It can be messy, especially with your clothes and will not come off.
The Silicone Roof Sealant
A caulk gun will have to be used in order to apply silicone roof sealant.
Silicone roof sealant is also a great option to fill in shingle cracks and leaky nail holes and is also used to repair folded or slightly lifted shingles.
A small, droplet-like amount of silicone will have to be placed with a caulk gun under the bent part of the shingle. You will then have to bend back the affected shingle into its original, proper placement, put weight on it and let the silicone dry. A bent flashing may be repaired in this manner too. When it comes to separations between the shingles and the flashings or vent or mortar, a small amount of silicon caulk will have to be pushed into it in order to cover the separation.
Preventing Future Leaks
Once you install a silicone roof coating, you receive a watertight warranty for up to 20 years. Silicone has a warranty, but leaks rarely develop. In most cases, once you install a coating, you roof will remain leak from for the full 20 year warranty term – and then some. Many roofs with a silicone roof see leak-prevention benefits long past the 20 year mark. This doesn’t mean that it’s a good idea to let your roof warranty lapse, as you never want to be out from under warranty coverage. The effectiveness of silicone roof coatings can last beyond 20 years, but you should remain covered under warranty.
Tips for Repairing a Leaky Roof
While most asphalt shingles are manufactured with the latest advancements in weather- and wind-resistance, fire safety, and long-lasting performance, even the best of them can develop problems over time. The good news is that an asphalt shingle roof is probably the easiest type to repair, since curled shingles can be flattened and re-secured, and old shingles can simply be replaced. Plus, asphalt shingles make the warning signs of a serious roofing problem readily perceptible. Follow the four steps to repairing a leaky roof outlined ahead, and you may find your problem short-lived.
1. Find the roof leak.
If you discover that your roof is leaking—most likely evident by water stains on the ceiling—note the leak’s location, then go outside with a good pair of binoculars to find the roof leak. Look to see if there are any curled, cracked, or missing shingles. Leaks can occur at any point where shingles butt, or where caulking and flashing have been compromised. End caps, the tent-shaped shingles that cover the angular peaks of the roof, can also be the source of leaks, so check those as well
2. Secure curled shingles.
Curled-back shingles, for example, can be re-secured by brushing on a coating of asphalt roofing cement or finding its equivalent compound in tubes for use with a caulk gun. When repairing a leaky roof, you’ll want to apply a generous amount of roofing cement to the underside of the shingle to make certain that the edge and corners are secured. Then press firmly to set.
Note: Shingles will be more pliable in warm weather than when it’s cold, so consider that factor when resolving problems.
3. Replace damaged or missing shingles.
If shingles are cracked, missing, or rotten, replacing them may be another simple fix for repairing a leaky roof (provided you have the replacement shingles). To remove a damaged shingle, lift the edges of the surrounding shingles and carefully remove nails with a pry bar. Once the nails are removed, the shingle should slide out. Scrape away any of the residue cement from the roof and level or remove protruding nails.
Before you attempt to replace a new shingle, round the back corners with a utility knife. This will make it easier for you to slide the shingle under the one above and align it with those on either side. Once you have it in position, lift the corners of the overlapping shingles and fasten the top of the new replacement with 6d galvanized roofing nails. Be sure to secure with nails in each corner. Last, cover the nail heads with roof cement and smooth down the overlapping shingle edges.
4. Fix flashing.
To repair leaks caused by metal flashing around chimneys and dormers, simply reseal joints using a caulk gun filled with roofing cement. If you see damage to joints previously sealed with a line of roof cement, apply a fresh new coat with a putty knife.